The Lamp Shade Renovation
By: Alycia - Editor
Recently, I started doing little crafty things. I started this for a couple of reasons. The first is because I have a great deal of time on my hands. The second is because I am going to be moving to a new city in the fall, and am going to be living in a dormitory (or residence). I have lived in residence before, and therefore know already that it’s easiest to live in one room when you can have things that reflect your individual style and personality. As you may or may not have guessed, I am pretty ridiculously girly with regard to my style. That reflects over and over again in the things that I pick for my room.
I found a matching pair of really cute lamps in the basement of my mom’s house. They’re small, and have silver bases, and the overall aesthetic is quite simple and clean. The lamp shade WAS just a plain off-white colour. Before I picked them up and brought them up for my own room, I of course asked my mother if she minded. She didn’t. My thought? Free lamps are good! So, after having the pair in my room for a while (they now live on my bed side table, which, might I add was a really excellent Value Village find! :)) I decided that they could use a bit or sprucing up… I wanted to add my own touch to them. So, I spoke to my mom, and she agreed it was a good idea, and went with me to the fabric/craft store. The outcome of my personal touch looks really good, and so I decided I would share my “Craft Recipe” with all of you!
I found a matching pair of really cute lamps in the basement of my mom’s house. They’re small, and have silver bases, and the overall aesthetic is quite simple and clean. The lamp shade WAS just a plain off-white colour. Before I picked them up and brought them up for my own room, I of course asked my mother if she minded. She didn’t. My thought? Free lamps are good! So, after having the pair in my room for a while (they now live on my bed side table, which, might I add was a really excellent Value Village find! :)) I decided that they could use a bit or sprucing up… I wanted to add my own touch to them. So, I spoke to my mom, and she agreed it was a good idea, and went with me to the fabric/craft store. The outcome of my personal touch looks really good, and so I decided I would share my “Craft Recipe” with all of you!
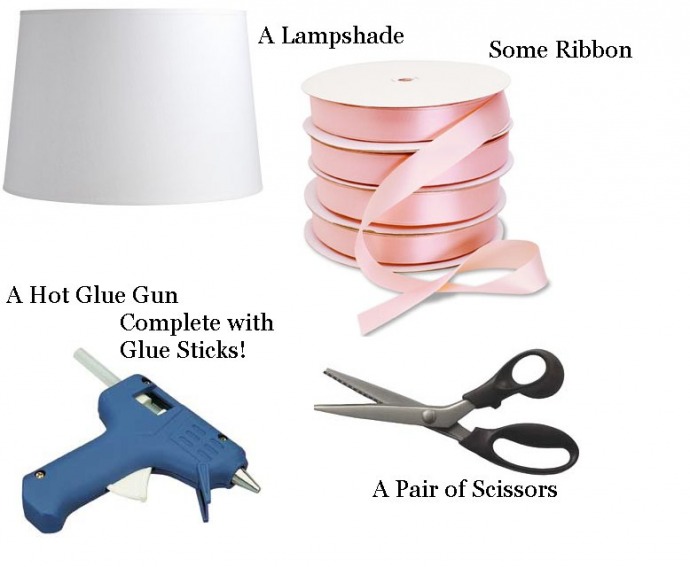
Here's what you need:
And here’s how you do it!
After plugging your glue gun in and letting it get REALLY hot (please do not touch the metal part on the gun, trust me, it really burns), apply about 1cm of glue across the bottom of the lamp shade, beginning at the shade’s seam (if there is one). Then, being careful not to let the glue cool, take one end of your ribbon and press it into the glue with your fingers. Hold the ribbon there until the glue cools and the ribbon is set in place. This will probably be quite hot on your fingers, but don’t worry, the glue cools quickly and won’t burn you any more than sticking your hands into hot dish water would!
Repeat this process in 1cm increments all the way around the bottom of the shade. IF you are using a thicker ribbon, you may want to make two lines of glue, parallel to one another at the top and bottom (approximately) of your ribbon. Keep in mind that when you press the ribbon into the glue it might squeeze out a little bit. That isn’t a big deal.
As you move from one centimeter to the next, pull the ribbon as tight as you possibly can, while still being gentle with it. As you pull it, simply guide the ribbon with your finger into the glue. As you do this, the pulling will stop as many imperfections as possible HOWEVER, there will still be some minor wrinkling; remember you are using a flat piece of ribbon on a round lamp shade (I know there are some of you out there with square shades, but most of you will have round ones). When you have been completely around the bottom of the shade, make sure your ribbon overlaps where you started, and cut it off from the rest of your ribbon. Make sure to glue your end down securely so that the ribbon won’t unravel or come undone from the shade.
When you’re done the bottom of the shade, you can choose if you want o do the same thing again on the top half or not. I chose to repeat the ribbon on the top of the shade as well, just to provide balance, and because I liked the sparkly ribbon.
This is my finished product!
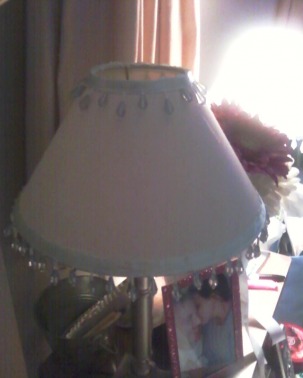

My apologies for the blurry photos! I had to take them on my cell phone, because my digital camera seems to have died!
I wish you the most luck while doing your own lamp shades! Don't be afraid to personalize. If it belongs to you, then I firmly believe that it should reflect that!
I wish you the most luck while doing your own lamp shades! Don't be afraid to personalize. If it belongs to you, then I firmly believe that it should reflect that!
